Use the Admin Module, accessed on the TME ClearView toolbar to manage user and Employee lists. You can create User and Employee records, assign Users to Employees, edit, and delete records.
Your view of information is based on your login level. You can view all Users or Employees of all the Organizational Hierarchy below you. For example, an NMSC user level can view all Users and Employees of all hierarchies below it, that are specific to the NMSC.
The terms Users and Employees are capitalized in this section because they have a specific meaning when used in the Admin Module, and they are defined in this section. In the following definitions, the actions referred to such as create, edit, assign, and delete are described in step-by-step procedures in the following Help topics:
Users are login credentials that include User name and a password, and they can be created at any level in the organization. You can assign active and inactive Users to Employees or you can create new Users to assign to Employees.
An Employee is a person employed at the Retailer level in the organization hierarchy. To grant an Employee access to the ClearView portal, you can create a new Employee record in the system and assign the Employee record to a User. You can also assign an existing Employee to a User.
Employee records are auto-created in the system when an import file contains an Employee code that is not yet in the ClearView system. The system auto-creates a User and it remains inactive until it is assigned to a User and activated by someone having access to the Admin Module.
Review the following two examples of assigning Users in the Admin Module.
Employee A was assigned to User A, then Employee A left the ClearView system. User A is now inactive and no longer works because no Employee is assigned to it. Later, you create a new record for Employee B and assign the inactive User A to Employee B. This action disconnects the Employee A record from User A, and reassigns Employee B to User A. You can edit the User A record to match the name of Employee B.
In the Master User List tab, you filter your view to see the inactive Users. You notice the inactive User record Joseph Black. You view the Employee List tab and select the Employee record for Mary Romero and assign her to the Joseph Black User. You can now return to the Master User List and edit the Joseph Black User record to display as Mary Romero.
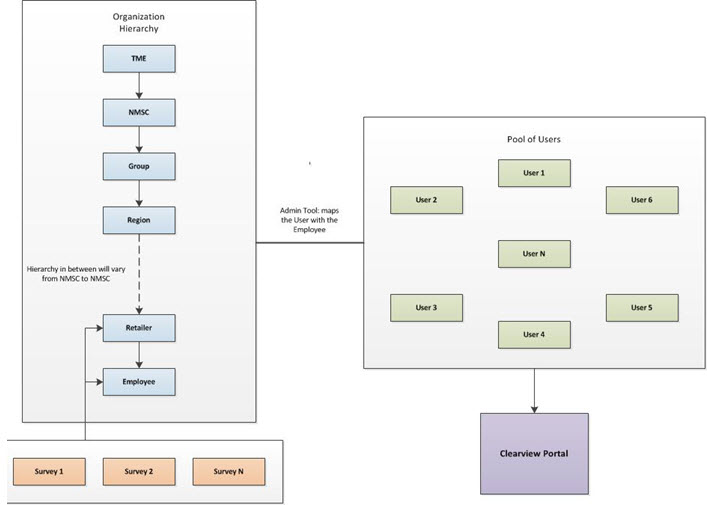
The following diagram shows the organizational difference between an User and an Employee. As shown in the diagram, an Employee is included under the Retailer level in the hierarchy. Users can be at any level in the hierarchy.

The Admin Module provides the following three tabs for viewing data.
The Master User List includes all Users existing in the ClearView portal. You can search for Users, change your view from all users, to active, inactive, or deleted Users, and edit and delete Users. Also, Users are added to the Master User List if the following occurs:
If the system does not recognize an Employee code in an import file, a User is automatically assigned to the new Employee code. The User is then listed in the Auto-Created Employees User List tab. The Users in this tab are all inactive. You can create a User, and you can either edit a User and make it active, or assign it to a different Employee. Once the User is active, it is listed in the Master User List.
The Employee List tab lists all the Employees in the system along with their Retailers. The Users assigned to each Employee are also shown in the list. You can change your view from all to assigned or unassigned users. You can create an Employee record and assign a user to it, and also edit and delete an Employee record.
[hyperlink from the Customer Reviews Page, section Access to the Moderation Tool will lead to this section]
If you have launched the Customer Reviews Module, then these are the applicable user permissions to the Customer Reviews Moderation Tool for your users that are created within the CSmile Admin Module.
There are several access levels available. Click for more detail.Click for more detail.
Use the existing user management flag and provide access to the new moderation tool admin tool if this flag is ticked.
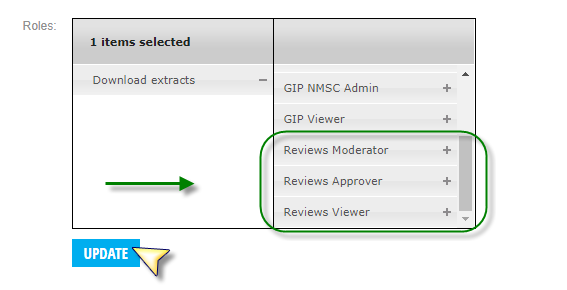
Assign your users with the required permissions by adding these roles to their profile with the Edit User function and click update to save changes.

Set up Customer Review Notifications simply by checking the Notification Email box under Customer Reviews.

Double check that the email entered into CSmile is valid.

See also:
Working with the Master User List