Working with the Employee List
For an overview that includes definitions
of key terms, examples, and an organizational diagram of Users and Employees,
see Admin
Module Overview.
Instructions for the Employees
list are shown in the following table.
 To go
immediately to a step, click any of the links below.
- To
filter your view, from the Master User tab, click the Filter
dropdown list, and select All,
the default, Assigned, or
Unassigned.
- To
create a new User, click the Create
User button.
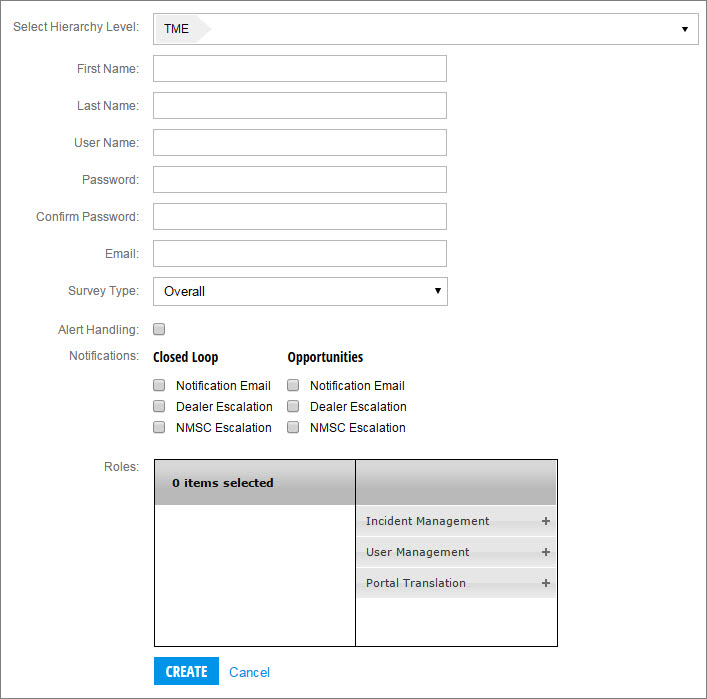
The Create New User page opens.

- At Select Hierarchy Level,
select the User's current hierarchy level.
- Enter information into the next six fields.
- At Survey Type click the
down arrow to select a survey type.
- At Alert Handling, to include
the user in Alert handling, select the checkbox.
 Selecting
this checkbox allows the User to edit Alerts from the Customer History
report page.
- At Notifications, select
the relevant notifications checkboxes for the User.
- At Roles, to select a role,
from the column on the right, click the + sign for the role you want
to assign to the User.
The role you clicked moves to the column on the left.
- Click Create.
The new User is now listed in the Master User List.
- To
create a new Employee record, click Create
Employee
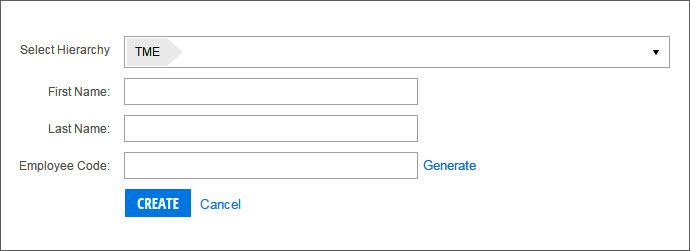
The Create Employee page opens.

- At Select Hierarchy, click
the down arrow to select the Employee's hierarchy level.
- Enter the first and last name.
- At Employee Code, enter
the code, or if you do not have a code, click Generate.
The system generates a code.
- Click Create.
The Employee record is created.
 Before
you can assign a user to the new employee record, you must wait until
the following day.
- To
search for an existing User, in the search box, enter the first,
last, or User name, organization name, or email address, then click
 .
row,
- To
edit an Employee record, search for the employee record you want
and then at the end of the row, click Edit.
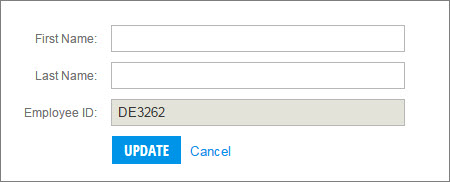
The Edit Employee page opens.

- Enter
changes and then click Update.
- To
return to the Employees List, from the toolbar, click
 .
.
- To
assign an Employee to a User, search for the employee record you
want to work with, then at the end of the row, click Assign.
The list of users from the Master User List opens.

- Use the search box to locate the user you want, then scroll to
the right, and click Reassign.
A message asks "Are you sure you want to map this employee to
this user?"
- Click Yes.
- To delete an Employee,
search for the record, and then at the end of the row, click Delete.
A message asks "Are you sure you want to delete this employee?"
- Click Yes.
The following occurs:
- The Employee record is deleted from all lists shown in the
Admin Module.
- The record is retained in the ClearView database.
See also:
Admin Module Overview
Working with the Master
User List
Working
with the Auto-Created Employee User List
 To go
immediately to a step, click any of the links below.
 To go
immediately to a step, click any of the links below.
 Selecting
this checkbox allows the User to edit Alerts from the Customer History
report page.
 Before
you can assign a user to the new employee record, you must wait until
the following day.
